Saturday, December 13, 2014

Server Side Development Environment - VirtualBox and Vagrant on OSX

If you're doing server-side development you probably want to take a look at using the VirtualBox / Vagrant combination.   This will allow your team to share standardized dev server configurations through your version control system, that is, you can define a standard server OS with provisioned software right in the Git project.   Developers can then easily create a 'production like' environment right on the workstations, or on any cloud provider like AWS or RackSpace.   This frees up your devops team from having to worry about supporting the server side software packages on whatever OS the developers like to use.   Quirks of MySQL, Java, Rails, or Python on Windows or OSX?  Forget it!   Just install and provision a the same software versions you are using in production on a virtual machine.

Basically, your 'developer setup' page (and you DO have one of these, don't you?) goes from some long list of steps (with different sections for different OS's) to:
  1. Install VirtualBox
  2. Install Vagrant
  3. Clone the project repo
  4. 'vagrant up' from the command-line
 Now, you have to figure out how best to deploy.

Why VirtualBox?

It's free, supports most common platforms, and Vagrant has built in support for it.

https://www.virtualbox.org

To install, just download and run the installer.   You probably won't be using VirutalBox directly.   Vagrant will be creating and starting the VirtualBox hosts.    However, you may want to just launch the application once to make sure it's installed properly.

The second step is to install Vagrant.

Why Vagrant? 

Lots of reasons!
  • Share the machine configs with your team, by checking in a Vagrant file into version control.
  • By default, the Vagrant machines share a directory with the main host.   This is much more convenient than scp-ing files to and from the virtual machine.
  • Share the running machine on the internet - Vagrant can expose the virtual machines on the internet for other people to test and such.  This is done via Hashicorp' Atlas service.
  • Provisioning - Not only does Vagrant start up the hosts, it can configure them.  You can use:
    • Shell
    • Chef
    • Puppet
    • Docker (new and cool - but probably not quite ready for production use at this point)
  • Providers - You can use VirtualBox, AWS, or any number of supported providers.  :)
My main purpose for using Vagrant is to start learning about Chef.

https://www.vagrantup.com

To install, just download and run the installer.

Vagrant IDEA Plugin


IntelliJ IDEA has a Vagrant plugin.  At the moment, this seems to mainly just provide a convenient way to do 'vagrant up', but it could come in handy.

What's in the Vagrantfile?

Basically, this file sits at the root of your project and defines the server OS, and provisioning mechanism for installing the required software.   Here are the important parts (IMO):
  1. The VM 'box' definition. This is equivalent to the 'AMI' (Amazon Machine Image) in AWS.  The Hashicorp Atlas service provides a whole bunch of 'box' definitions for most common Linux distros.
  2. Port mappings - This allows you to map ports on the outer host to ports on the guest OS.   You can use this to forward web server ports and ports for debugging, so you can attach your favorite IDE to the server process in the guest OS.
  3.  Shared folders.   By default, the folder that has the Vagrantfile in it is shared under /vagrant.   This is a very convenient way to transfer files to and view files on the guest.
  4. Provisioning - This is how Vagrant will install and configure the required software on the machine.  Start with a simple shell provisioner.   Basically, it's just a shell script that Vagrant will run after bringing up the machine.

Sunday, November 30, 2014

Spring for Java EE Developers - Part 3

Related to Factory Objects - Prototype Scope

In the previous post, I mentioned a few ways to make a factory or provider object.

  1. A configuration bean - The bean class is annotated with @Configuration, and you can add various @Bean methods that get called to create the instances.
  2. Factory Bean / Factory Method  -
A related technique is Spring's prototype scope.   This tells spring to make a new instance of the bean for every injection and every lookup.   In XML, it looks like this:

<bean id="makeOne" class="com.foo.SomeBean" scope="prototype"/>

Similarly, with annotations:

@Component
@Scope(ConfigurableBeanFactory.SCOPE_PROTOTYPE)
public class SomeBean
{
...
}

Events

Spring also has an event framework, along with some standard events that the framework produces, allowing you to extend the framework more easily.    While this is not as annotation driven and fully decoupled as the CDI event framework, it functions in pretty much the same way.

To create your own event, simply extend ApplicationEvent.

public class MyEvent extends ApplicationEvent
{
    private final String message;

    public MyEvent(Object source, String message)
    {
        super(source);
        this.message = message;
    }

    public String getMessage()
    {
        return message;
    }
}

To produce events, beans must implement ApplicationEventPublisherAware.    Usually this class will store the ApplicationEventPublisher and use it later on to publish events.

@Component
public class MyEventProducer implements ApplicationEventPublisherAware
{
    private ApplicationEventPublisher applicationEventPublisher;

    @Override
    public void setApplicationEventPublisher(ApplicationEventPublisher applicationEventPublisher)
    {
        this.applicationEventPublisher = applicationEventPublisher;
    }

    public void someBusinessMethod()
    {
        ...
        applicationEventPublisher.publishEvent(new MyEvent(this, "Hey!  Something happened!"));
        ...
    }
}

NOTE: It is important to understand that all of the listeners will be called on the caller's thread unless you configure the application event system to be asynchronous.   I'll cover that in another blog post.   The benefit of having the listeners execute on the caller's thread is that the Spring transactional context will propagate to the listeners.

To observe events, have a component implement ApplicationListener<T>, where T is the event class.

@Component
public class MyListener implements ApplicationListener<MyEvent>
{
    @Autowired
    private SomeBusinessLogic logic;

    @Override
    @Transactional
    public void onApplicationEvent(MyEvent event)
    {
        logic.doSomething(event.getMessage());
    }
}

The Downside of ApplicationEvent

One noticeable downside of using Spring's ApplicationEvents is that IDEA does not recognize them as it does with CDI events.   This is kind of a bummer, but it's no worse than using Guava's EventBus, for example.

Mitigation?   I think that using the event class (the subclass of ApplicationEvent) for one and only one purpose is probably sufficient.   It's a good idea to have purpose built DTOs anyway.

The Benefits of ApplicationEvent

The benefits of using ApplicationEvent over other possibilities can make them very worthwhile:
  1. De-coupling excessively coupled components - Often, a business logic component will trigger many different actions that don't need to be tightly coupled.   For example, notifying users via email / SMS and IM is best left de-coupled from the actual business logic.   The notification channels don't need to know about the business logic, and vice versa.   Also, you can much more easily add new notification channels without modifying the business logic at all!

    This was a very useful technique in improving the architecture of an existing Spring application that I have been working on.
  2. Zero additional libraries - You're already using Spring, so there's nothing to add.  No additional dependencies.
  3. Listen for Spring's own events - You can hook into events that Spring itself fires, which can be very useful.   Application start and stop, for example.

Request and Session Scope

Request and Session scopes are not hard to understand - each scope defines a set of objects that exist for the duration of the scope, and are destroyed when the scope ends.   However, the challenge comes when a longer lived scope wants to inject a bean in a shorter lived scope (e.g. an application scoped bean wants to inject a session or request scoped bean), this gets a little more complicated.

In implementing this, Spring takes a very different approach than that of CDI and Seam.  In CDI and Seam, an application scoped component is injected with request / session / conversation scoped beans on every method call (and un-injected when the method completes!).

Spring takes a different approach:  rather than inject the beans on every single method call, Spring injects a proxy and that proxy is modified to refer to the bean instance in the proper scope by the framework.

@Component
@Scope(value = WebApplicationContext.SCOPE_REQUEST, proxyMode = ScopedProxyMode.TARGET_CLASS)
public class RequestBean
{
    private final long createdOn = System.currentTimeMillis();

    public long getCreatedOn()
    {
        return createdOn;
    }
}

Of course, this only works when Spring MVC is enabled, as otherwise there is no request context.

See also:


Wednesday, August 13, 2014

Spring for Java EE Developers - Part 2

The second installment in my series of blog posts about transitioning to Spring when coming from Java EE (or maybe other DI frameworks).    See  Spring for Java EE Developers for the first post.   This time I'll be diving in to some more details.

 Factories

In CDI there is @Producer, and in Guice there is the Provider<T> interface.   These are very useful when you have some run-time decisions to make about what object to produce or how to configure it.   So, how do you make a factory in Spring?

Method 1 - Make a configuration bean

One simple way to create a factory in Spring is to add a @Configuration bean.   Factory methods can be annotated with @Bean, and the factory method parameters will be injected.   You will need to add CGLIB to your (run time) dependencies if you want this to work properly.

  1. Make sure you have cglib in your dependency list.
  2. Add <context:annotation-config/> to your applicationContext.xml (or other XML configuration).
  3. Create a class in a package that is scanned for annotations, and annotate it with @Configuration.
  4. Each method in the @Configuration class that produces a bean should be annotated with @Bean.   Parameters to the @Bean methods will be injected automatically, and can have @Value and @Qualifier annotations.

Method 2 - Make a factory bean / factory method

Another way is to use factory-bean and factory-method.
  1. Register the factory bean.  For example:

    <bean id="thingFactory" class="eg.ThingFactory"/>

    Where eg.ThingFactory has a method public Thing getThing()
     
  2. Register the produced object by referencing a method on the factory bean.
     
    <bean id="thing" factory-bean="thingFactory" factory-method="getThing"/>
    
    
    Spring will then call the getThing() method on the ThingFactory to get the instance.

Injecting values vs beans

In other DI frameworks, injecting a String is the same as injecting any other component.

In the Spring bean XML format, there is a difference between injecting a "value" vs injecting another bean.    To inject a bean, use ref="someBeanId" (a.k.a. bean 'name').   To inject a value, use value="some value or Spring EL".

Using Spring annotations, you can add  @Qualified for a named bean implementation (if there are more than one), and @Value to specify a Spring EL expression.

Transactional Beans

In EJB3, there are some simple transaction annotations that allow you to declare the transaction support you want for your business logic.   Spring has a very similar feature.

@Transactional - provides transaction control.   Very similar to EJB3 - class level and method level control. 

<tx:annotation-driven/> enables the transaction annotation support.

You can also use TransactionTemplate for  programmatic control when needed.

Post-Commit Actions and Transaction Synchronization

Use TransactionSynchronizationManager to get an interface that is similar to JTA Transaction.registerSynchronization().   Something like this:

TransactionSynchronizationManager.registerSynchronization(new TransactionSynchronizationAdapter()
    {
           void afterCommit()
           {
                // ... do stuff ...
           }
    });

A few notes on this:
  • If this is used outside of a transaction, the method will fail.   You can have it call the 'after commit' immediately if not inside a transaction, or just let it throw an error and fix the problem.
  • TransactionSynchronizationManager is not an injectable thing.   You have to use the static methods.
  • TransactionSynchronizationAdapter is an empty implementation of TransactionSynchronization that you can use to override specific methods.   Pretty handy.
See this question on SO.

Next Time...

In the next post I'll try to cover Extended Persistence Contexts and some of the web MVC stuff. 

Sunday, July 20, 2014

My first attempt at using AWS EC2

There are lots of cloud hosting services out there.   AWS is one of the most popular (if not the most popular), so I decided to set myself up with a free account so I could learn how to use it.   This blog post covers my initial experiences.
  • Signing up is very easy, just go to aws.amazon.com.   I signed in with my personal Amazon account, and created an AWS account.
  • I will probably be using EC2, and RDS -  An EC2 instance (VM) to host server-side web applications (Java) and RDS for the database.    I will probably use EBS as well, so I can have some durable filesystem storage for the EC2 instance.
  • I started with the "Basic" free tier.    You need to enter your CC information though, in case you go over the limitations of the free tier.   Since I'm mostly just going to be creating VMs for learning, mostly likely I won't be keeping too many instances running.

The free tier

Currently the AWS free usage tier gives you the following for one year:
  •  EC2 (virtual machines) - 750 hours/month on a 't2.micro' instance that is Amazon Linux, RHEL, or SLES
  • EBS (file system storage) - 30GB, 2 million I/O ops, 1G of snapshot storage
  • RDS (Relational db) - 750 hours/month on a 'micro' instance, 20G of storage, 20G of backup, 10M I/O ops
 See http://aws.amazon.com/free

What's a t2.micro instance?

T2 is Amazons instance type that is optimized for 'burstable performance'.   A t2.micro instance has:
  • 1 CPU and 1G of RAM.
  • Only EBS for durable storage (i.e. anything not on EBS will be lost when the machine is shut down).
750 hours per month?   Should I start and stop my instances?

You probably shouldn't start and stop instances too often.   The billing granularity is hourly, so if you start an instance, you might as well keep it running for an hour.    If you stop an instance, you might as well keep it stopped for at least an hour.

Also, if you start and stop an instance three times in an hour, Amazon will bill you for three hours.   So, you need to think about whether you really need to shut down or not.   This makes sense because Amazon probably doesn't want everybody to be constantly starting and stopping machines all the time.

See this page for more.

It is also a good idea to enable billing alerts.

Launching an Instance

Go to the AWS console, click on EC2.   Click 'Launch Instance'.
  1. Chose a machine image - Make sure you check the 'Free tier only' box if you want to stay in the free tier.   I chose Amazon Linux.
  2. Choose an instance type - t2.micro is the only free tier instance type, so I chose that.
  3. Configure instance - leave the defaults
  4. Add storage - leave the defaults
  5. Tag instance - leave the defaults
  6. Configure Security Group - Since I'm doing this for the first time, I created a new security group called "Administrators".   I chose 'My IP' for SSH access.   Should be good enough for today, and I suppose that I can change that access rule via the AWS console later to add new IP addresses.  Click 'Review and launch'

    Boot from General Purpose (SSD) prompt: keep the default choice.  Click Next.
  7. Review - This should all look okay, so just go ahead and launch it.

    Create a new key pair: Select 'Create a new key pair' and enter the key pair name.   You'll need to download the private key (.pem file) and store it somewhere.   I put my in a Google Drive folder so I could get to it later.

Connect to the new Linux instance with SSH


See this page for Windows/Putty and this page for Linux/OSX ssh.

You'll need the private key, the instance id, and the public DNS address of the instance.

Amazon Linux


This linux distro is in the Red Hat family - it uses yum and rpm.   Many packages are available to install.   I saw that mine had a Java 7 JRE installed, and that the yum repo had Tomcat 7 available, as well as MySQL and other things.

What's next?

  • Set up Tomcat, enable HTTPS access from the outside.
  • Set up MySQL on RDS - Connect Tomcat to MySQL.
  • Look into making my own machine images (AMIs) that have everything pre-installed and set up.
Once I get Tomcat->MySQL going, hopefully I can begin installing webapps to see how well the t2.micro instance works.    If it works well, I might consider moving my home wiki to AWS.

 I may also consider doing the same thing with Open Shift, to compare and contrast the costs and ease of use.


Friday, July 18, 2014

Eclipse for IDEA Users

If you are an IntelliJ IDEA user, there's a good chance you'll be working on a team with people who use Eclipse.   Here are some basics that will help you get the two environments working together smoothly.

Main Differences

  • The concept of a project is basically the same as it is in IDEA.
  • Eclipse has the concept of a 'workspace', which contains multiple projects.   You might make one workspace for your workplace, and another for an open source project or experiments.
  • Most of the features of IDEA exist in Eclipse, but they may be in unexpected places in the UI.  For example:
    • The plugins are installed / managed under the Help menu (and sort of under the About dialog?).  This will certainly generate a few WTFs.
    • 'Team' = version control.   That kept making me whinge.
    • Perspectives - this is kind of a 'mode' concept.   Mostly maps to the side/bottom panels in IDEA.

Install Eclipse

Best to just follow the directions.   Installation is usually not a big deal, but it's a good idea to:
  • Install the same version that everyone has on your team.
  • Install the package solution that is appropriate for the kind of development you do.   For me, this is 'Eclipse IDE for Java EE Developers'.
  • Here is an example of installing Eclipse on OSX.
    Basically: Download, unpack, drag the 'eclipse' folder into Applications (not the Eclipse application, but the whole folder).

Eclipse Plugins

  • Install plugins with Eclipse Marketplace, which is (oddly enough) under the Help menu.
  • Uninstalling plugins is done in the About Eclipse menu item, which is in the Eclipse menu on OSX.   See this wiki page for more.
  • You'll probably need to install a version control plugin (e.g. 'subclipse' if you're using subversion) and you'll need to install a dependency management plugin as well (e.g. gradle).
  • Often, plugins won't work until you delete the project from the workspace and re-import it into the workspace.

Getting Around

The Workspace


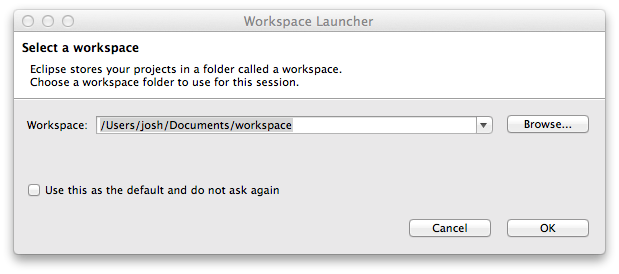
The workspace is a collections of references to project directories.   These show up as top level items once you have some in your workspace.  Eclipse will prompt you for a workspace when you start it up:

If you select 'Use this as the default', then you can easily switch workspaces using File -> Switch Workspace.

The Project Explorer will show all the projects added to the workspace.    At first there will be none, so you will typically import a project that is already on your disk.

Importing a project

This is how you get a project into the workspace, and it can be found under File -> Import, or by right clicking in the Project Explorer.  If you already have a git clone / svn checkout, the workspace will basically link to the existing location.   If you clone / checkout from version control, the default behavior is to put the files in the workspace directory.

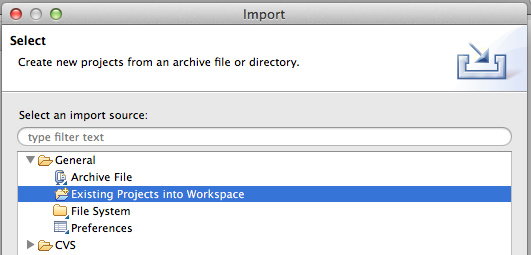
To import a typical VCS clone/checkout that already has Eclipse project files in it, chose Generic/existing project:

The project should import successfully if you have all of the right plugins installed.   At this point you will probably want some additional views of the project: version control, etc.   This is where 'perspectives' come in.

Perspectives

Perspectives are basically different modes you can work with.   IDEA has similar windows, but it doesn't force the whole UI in to a 'mode' like Eclipse does.   To access perspectives, click the perspectives button:
The most important perspectives (from my perspective, at least ;-> ):
  • Team Synchronizing - This is similar to the VCS window in IDEA.
  • Java EE - This is basically the main project view in IDEA.

Project Files

Eclipse stores it's project information in two files .classpath, and .project, and a .settings directory.   These are roughly equivalent to the .idea directory and the IML files.

These can all be added to version control so the project can just be cloned/checked out and opened by other team members.

Things that you'll miss

So here are the things that you'll probably miss coming from IDEA:

  • Deep navigation and code 'grokking' - Eclipse just doesn't know as much about your project as IDEA does, so it can't help with some more advanced referencing and navigation.
  • Refactoring - Yeah, Eclipse has refactoring but it's very basic in terms of features and in terms of how thorough it is.   IDEA knows much more about the project, so it can refactor very completely.   With Eclipse, be prepared to complete many of the refactorings by hand.   It gets the basics done though: renaming local vars, extracting methods, etc.
  • Multiple classpaths - IDEA has separate class paths for testing vs runtime.   In Eclipse, there is only one classpath, so you may encounter some strange results when running tests or non-test programs from within Eclipse as compared to running them from IDEA.   My advice is to not rely on running your code from the IDE.   Always know how to do things from the command line as a fallback.
  • Change lists - If you're using Git, you won't notice this.   However, if you're (still) using Subversion, change lists don't seem to be there in Eclipse.    Maybe they are, but I haven't been able to find them yet.


Thursday, June 26, 2014

Migrating from ANT and IVY to Gradle

Related to the previous post, Migrating from Maven to Gradle, here are some things I found when attempting to migrate an ANT / IVY build to Gradle.

Advantages over ANT/IVY
  • XML is not for humans - Gradle's DSL is much more readable and more concise.   No need for 'ivy.xml' and 'build.xml' and tons of 'properties files'.
  • Conventions -  Avoid re-inventing the wheel.   If you use the conventions for the Gradle plugins, this eliminates a great deal of code and makes your project look 'normal' to other people.  They can just dive right in and be productive.  "You are not special"  ;)
  • Declarative - Gradle is more declarative and eliminates a ton of boring, boilerplate code compared to ANT.
  • Plugins - Eliminate even more boilerplate code, and gain some conventions. 
    • Get dependencies.
    • Compile  the main code and the test code.  Process any resources.   Compile dependencies (multi-module).
    • Run the test suite and generate reports.
    • Jar up the main code.
  • Self install - Gradle self-installs from VCS via the gradle wrapper.
  • 'one kind of stuff' - Dependencies are declared right in the build file.
  • Daemon mode!
Getting started
  • Add build.gradle and settings.gradle to the root directory.   Can be empty files at first.
  • Gotcha #1: If you are using Subversion with the standard layout, Gradle will think that the project is named 'trunk' (or whatever the branch directory is... Subversion really sucks at branches!).

    To fix this, simply add rootProject.name='the-real-project-name' in settings.gradle.
  • Re-open the IDEA project.  IDEA will import the gradle project.
    Eclipse probably has something similar.
  • For a Java project, apply the Java plugin in build.gradle: apply plugin: 'java'
    This will automatically add the expected tasks for compiling, running tests, packaging as a jar, etc.  You don't have to write this boring stuff!
  • Custom source locations - Let's say the project has the sources in src and test_src.  This is not the standard layout for the java plugin, so we'll need to configure that in build.gradle:

    sourceSets {
        main {
            java {
                srcDir 'src'
            }
            resources {
                srcDir 'conf'
            }
        }
        test {
            java {
                srcDir 'test_src'
            }
        }
    }
    
  • Now we need to add the dependencies.   Since Gradle is based on Groovy, it's easy to make a simple converter:
    task convertIvyDeps << {
        def ivyXml = new XmlParser().parse(new File("ivy.xml"))
    
        println "dependencies {"
        ivyXml.dependencies.dependency.each {
            def scope = it.@conf?.contains("test") ? "testCompile" : "compile"
            println("\t$scope \"${it.@org}:${it.@name}:${it.@rev}\"")
        }
        println "}"
    }
    

    Just run the task and paste the output into the dependencies closure.

    We can also do something more radical: Parse the ivy.xml and populate the dependencies that way, see this post.
  •  Gocha #2: If you are using a properties file to define versions in ivy.xml, this will be a little different in Gradle.
    • Gradle supports 'extra properties' typically defined in an 'ext' closure.   These can be referenced inside double quoted strings in the dependencies closure.
    • Gradle doesn't like dots in the extra property names.   I changed them to underscore.  For example:
       
      ext {
        version_junit="4.11"
      }
      
      dependencies {
         ... blah blah blah...
         testCompile "junit:junit:${version_junit}"
      }
      
    • It's nice having everything defined in one place. :)
  • At this point, you have a basic build with compilation, testing, test reports, and all that.

Friday, June 20, 2014

Migrating from Maven to Gradle

I thought I'd share some of my experiences with migrating from Maven to Gradle for a small Java open source project.

The Strategy

First, what's the best way to do this?   The project is a fairly straightforward Java project without complex Maven pom.xml files, so maybe the best way forward is to just create a Gradle build along side the Maven one.

Some advantages over Maven


 Here are some of the advantages I found when using Gradle:
  • The 'java' plugin does almost all the work.   It defines something equivalent to the Maven lifecycle in terms of compilation, testing, and packaging.
  • Much smaller configuration.  No more verbose pom.xml files!
  • A multi-module project can be configured from the top-level build.gradle file.
  • Dependency specifications are more terse and also more readable.
  • It's much straightforward to get Gradle to use libraries that are not in the Maven repositories, e.g. in version control.   (However, I do believe that it's best to make a private repository with Artifactory or Nexus and install the libraries there, rather than keeping them in version control).
  • Dependencies between sub-modules is also very easy.
  • The whole parent/aggregator/dep-management thing in Maven is a bit clunky.   Gradle makes this much easier.  You can even do a multi-module build with a single Gradle build file if you want.

 First Attempt

Here are the steps I took.
  • Using IDEA, create a new Gradle project where the existing sources are.  Set the location of the Gradle installation.   You should see the Gradle tab on the right side panel.
  •  Create a build.gradle file and a settings.gradle file in the project root directory.
  • The basic multi-module structure can be the same as a Maven multi-module build:
    • A 'main' build.gradle file in the root directory.   Along with a settings.gradle file that has the overall settings.
    • Sub-directories for each module.
    • Each module directory has it's own build.gradle file.
    • NOTE: If the module dependencies are defined correctly, building a module will also build the other dependent modules when you are in the module sub-directory!   Major win over Maven here, IMO.
  • Apply the plugins for a Java project, set the group and version, add repositories.  In this case I have a multi-module project so I'm putting all of that in the allprojects closure:

    allprojects {
      apply plugin: 'java'
      group = 'org.jegrid'
      version = '1.0-SNAPSHOT'
      repositories {
        mavenCentral()
        maven {
          url 'http://repository.jboss.org/nexus/content/groups/public'
        }
        flatDir {
          dirs "$rootDir/lib" // If we use just 'lib', the dir will be relative.
        }
      }
    }
    

    I also have some libraries in the lib directory at the top level because they are not in the global Maven repos, or in the JBoss repo. The flatDir closure will allow Gradle to look in this directory to resolve dependencies. 
  • Add dependencies.   For a multi-module build this is done inside each project closure.   Use the 'compileJava' task to make sure they are right.
In the end, this project didn't really work with Gradle because the dependencies are too old.   So, I will need to rebuild the project from the ground up anyway.   Some of the basic libraries have undergone many significant changes since the project started, so it's time to upgrade!

Basic Gradle Multi-Module Java Project Structure

Okay, so in creating a brand new project, the canonical structure is much like a Maven project.

  • In the root directory (an 'aggregator' project) there is a main build.gradle file and a settings.gradle file.   This is roughly equivalent to the root pom.xml file.
  • In each sub-project directory (module) there is a build.gradle file.   This is roughly equivalent to the module pom.xml files.
  • The settings.gradle file has an include for each sub-project.   This is roughly equivalent to the '<modules>' section of the root pom.xml file.
  • An allprojects closure in the root build.gradle file can contain dependencies to be used for all modules.   This is similar to a 'parent pom.xml' (but much easier to read!).
One thing I wanted to do right away is to create the source directories in a brand new module.  This is pretty darn easy with Gradle.   Just add a new task that iterates through the source sets and creates the directories:

  task createSourceDirectories << {
    sourceSets.all { set -> set.allSource.srcDirs.each { 
      println "creating $it ... "
      it.mkdirs() 
      }
    }
  }

I added this in the alllprojects closure, and boom! - I have the task for all of the modules.  Neato!   I can now run this on each sub-project as needed.

Porting The Code


One I had the directory layout and basic project files I can begin moving in some of the code.    I started with the basic utility code for the project and the unit tests.   Like I mentioned, this was using a very old version of JUnit, so I needed to upgrade the tests.

Diversion One - Upgrading to JUnit 4.x

Upgrading to JUnit 4.x is actually pretty easy.   For the most part it retains backwards compatibility.   There are a few reasons you might want to upgrade the tests.
  • I prefer annotations over extending TestCase.   This is a pretty simple transform:
    1. Remove 'extends TestCase'
    2. Remove the constructor that calls super.
    3. Remove the import for TestCase
    4. Add 'import static org.junit.Assert.*'
    5. Add @Test to each test method.
  • (already mentioned) Take advantage of 'import static'! import static org.junit.Assert.*
  • Expected exceptions:
    @Test(expected=java.lang.ArrayIndexOutOfBoundsException.class)
     
  • @BeforeClass and @AfterClass annotations to replace setUp() and tearDown().

Diversion Two - Using Guice or Dagger instead of PicoContainer?

I really enjoy using DI containers.  It takes so much of the boilerplate 'factory pattern' code out of the project and makes for easy de-coupling and configuring of components.   In the previous version of the project I had used PicoContainer.   

  • Pico - Pro: Good lifecycle support.   Really small JAR file.   Con: Not as type safe.  Project seems to have stalled.
  • Guice - Pro: Not as small as Pico, but still very small.   More type safe.  Large community.  Con: Bigger jar than Pico (but not too bad... without AOP its smaller).  No real lifecycle support.
  • Dagger - Pro: Really small, with a compiler! Con: Gradle doesn't have a built in plugin for running the dagger compiler (well, as far as I can tell).
I think I'll give Dagger a try as it will cause me to learn how to make a Gradle plugin.   Even if I don't succeed, I'll learn more about how Gradle works.

See also:

Sunday, June 8, 2014

Spring for Java EE Developers

Spring has been around for a long time now, and has had a significant impact on the newer Java EE standards such as JSF, CDI, and EJB3.   In some ways, Spring could be considered a 'legacy' at this point, but since it's out there it is good to know the basics in case you find yourself working with a Spring-based system (like I have).


I'll post more as I learn, but here are my initial thoughts...


1.  Transitioning to Spring - It's not that bad

In addition to influencing the newer Java EE standards, Spring itself has been influenced by the newer standards.   I'm sure there are some people who will want to argue about which came first, etc.  This is not interesting, IMO.   Both communities benefit from the influences.
  • Annotation-based configuration - Spring no longer requires all components to be defined in a separate XML file (which is considered 'old school' at this point, although IDEs make this much easier to deal with).
    • You can actually use a combination of XML config and annotations in a manner very similar to Seam 2 and CDI.
    • You can also do "Java based" configuration like Guice or Pico.   I'm not really that keen on this approach, but it could come in handy in certain cases.
    • You still need a main configuration XML file, but that's no big deal.   In CDI you need META-INF/beans.xml and Seam you need components.xml.   The main difference is that you can configure the scanning, which could be useful.
  • Supports JSR 330 @Inject and JSR-250 lifecycle annotations - If you are already familiar with CDI and EJB3, this can make the transition easier.   The Spring-specific annotations offer some additional control (the standard annotations have limitations), but these can really help ease the transition.
  • No need for a separate POJO DI mechanism - One issue that I did experience with EJB3 / CDI is that I found I needed a POJO level underneath the EJBs to share very basic services.   I used Guice for this, as at the time Guice was very small and light.   With Spring, you can use it as your POJO DI framework too, although it's significantly slower (instantiation time) and heavier (bigger jar files) than some others.   In any case, you can use it if you have POJO Java processes that are not part of your application server cluster.   'One Kind Of Stuff' and all that.
  • JSF Integration - Spring Web Flow can be configured to integrate the Spring contexts with JSF EL, similar to Seam and CDI.
  • Spring Web Flow ~= Conversation - Having a 'sub-session' concept to allow the developer to retain state between pages is essential nowdays.   A "flow" is fairly similar to a "conversation" in Seam and CDI.  There are some significant differences in how a 'flow' is controlled, but the overall concept is the same.
  • LOTS of boilerplate-code-eliminating features! - This is something that Seam2 had a bit of, but Spring has taken this much further:
    • Spring Data - Define interfaces for DAOs, and Spring Data writes all the boilerplate JPA code.
    • Defining a DAO service that provides a RESTful JSON interface can be done with hardly any code at all.
    • Spring Roo - Generate baseline code and add components easily.   Like the 'forge' stuff in JBoss.   Not sure how useful this really is with an existing project, but it could be a quick way to get the skeleton code in there. 

2. The Bad News

NOTE: This is not an anti-Spring rant.   I'm just pointing out a few facts.
  •  Spring is big - It is no longer the case that Spring is 'lighter' than Java EE - Both systems are highly modular, and very comprehensive.   There are so many Spring add-ons now, expect to spend time wading through them.  At this point, it might as well be an application server.

    On the other hand, it is well documented and very modular, so that mitigates things.
  • Spring is not a standard, it's an implementation - This is perhaps the biggest problem I have with Spring.   It is like an alternate universe where there is only one implementation of the standard, and no independent community defining the standards.   Sure JSRs and all that have their disadvantages, but Spring does have a considerable 'vendor lock in' problem (although it is OSS, so it's partially mitigated).  Sometimes it can be good to know you can pick a different vendor without re-writing the whole thing.

    On the other hand, if you use Spring, you have a "container within the container", so the idea of porting is that you would port your inner container as well.
  • Spring AoP is more complex than EJB3 and CDI - Also a big pet peeve of mine.  It's relatively easy to make interceptors in Seam, EJB3, and CDI.   Granted, Spring AoP is much more powerful, but it's also got a lot of things that seem (to me) like they wouldn't get a lot of use.   In my experience, this kind of complexity results in two problems:
    1. Longer learning curve - Developers take more time to get familiar with the techinque.
    2. A whole new kind of spaghetti code - This often happens when a developer gets through the learning curve and then proceeds to use AoP as a "golden hammer".

    On the other hand, if you really need to do fancy stuff with AoP, (um... do you really need that?), it's there if you want it.   AoP can really be great when used wisely.
  • Lots of references to JSP in the documentation - JSP is now deprecated.   It's a huge step backward from JSF 1.2 & Facelets or JSF2.

3. Things I'm Still Figuring Out

  • Transaction / Hibernate Session management - In an older version of Spring, there were some really serious problems with Hibernate Session management and JTA.   Maybe this is no longer relevant, but I do remember looking at the Spring session management code and thinking "ugh! How did this every work?" (sorry guys).   This is probably addressed, but I do want to know if the 'extended persistence context' concept exists with Spring and/or Spring Web Flow.  This is very important to making simple, transactionally sound, high performance web apps!  
  • JSF Integration - I'm wondering just how deep this is.

Saturday, May 24, 2014

Thinking about Java 8

With all the fanfare of the impending Java 8 release, I thought it would be a good opportunity to brush up on some of the new features and think about how useful they might be at work.   Here's what I've come up with so far:

  • @FunctionalInterface - I like this as it allows me to lock down interfaces that I want to have only one method (which is what makes them functional, or function-like).   I know a co-worker or two who will really like this.
  • java.util.time - Finally!   JODA time users (like me) will find this to be very familiar looking.
  • Lambdas - I think any Groovy user will say "finally, something like groovy closures!".   This will probably come in handy, but...
    1. As with anything concise and powerful, it could be misused.  Golden hammer problems might happen (suddenly everything has to be a Lambda).
    2. The syntax is close to what Groovy does, so it might be a little confusing to those of us who switch back and forth between Groovy and Java.
    3. The combination of Lambdas and function/method reference shorthand can result in some very 'tight' code.
     
  • No more Permanent Generation -  Okay, so now classes, interned strings and static fields are in the existing 'old' generation?   Sounds good to me initially, since I'm a big fan of 'one kind of stuff'.   However, I'm not sure about how this will affect GC configurations such as the one that I use frequently at work (ParNew + CMS).
 These features reduce the gap between Java and Scala.   As good as Scala is, it's not easy to justify using it in many cases, and with Java 8, I think that set of cases got quite a bit smaller.   I'll probably learn Scala anyway, just because, but for production code I'm thinking Java 8 would be a safer bet.

Friday, May 23, 2014

Job Hunting - Networking and Recruiters

I figured I'd write about my job search here, since that's part of being a software engineering world.   Hopefully some people will benefit from some of my experiences.

  1. Keep a list of opportunities - Company name, position, status (applied, first interview, etc.) any notes about each interview.   This will come in handy when talking to your network or recruiters.   I use a Google apps spreadsheet for this.   Keep the active jobs at the top, and the 'no' list at the bottom.
  2. Use your network - Don't be afraid to reach out to your industry friends and former co-workers.   I used to feel that this was kind of... 'cheating', but that is a big mistake.   These are people that know you, that have worked with you.   You don't need to convince them of anything really.   Your friends will be happy to help you out if they can.    You would do the same for them, wouldn't you?   If they don't have anything suitable at their companies, maybe someone they know will.
  3. Go to some tech meetups in your area - In addition to maybe learning about some new things, it's a great way to meet other technical people.  Often, if a company is hiring they will encourage their engineers to go to these events and look for talent.   It might be a good idea to print up some personal business cards to hand out.
  4. Use recruiters to gain access to other opportunities - A good recruiter will have access to some opportunities that you may not know about.   They will also handle the interview scheduling, and give you more insight into the structure of the hiring company.   When you're interviewing through your network, you have to do all this yourself.  
    • Make sure the recruiter lets you know about any job before sending your resume anywhere.   Check your list to make sure you haven't already applied.
    • Remember, recruiters are getting paid by the hiring company, usually as a percentage of the yearly comp.   So, they will put much more effort into a senior level position than any junior position.
  5. Filter the opportunities, especially when going through your network - If the hiring manager requires certain technical skills that you don't have, don't just send send your resume.   If the job sounds really interesting, but your skills are not a great match, maybe a short conversation with the hiring manager is in order.   Sometimes, the hiring company wants to hire "good people" who can learn the technology specifics.   Other times, the company really wants something very specific (which IMO is a bit of a red flag), so if that's the case don't waste everyone's time by applying.
  6. Filter recruiters - If a recruiter is not showing you anything exciting, isn't efficient at scheduling interviews, or doesn't prepare you well for the interviews then move on.   No point in wasting time.  

Tuesday, April 22, 2014

Upgrading Fedora - Notes

A few notes on upgrading Fedora installations.


Fresh Install 

Probably the safest way to get a working upgrade is to back up any home directories or important configurations and go with a fresh installation.

Upgrades often leave undesirable configurations in home directories (GNOME configs, for example).  This often leads to strange desktop / display issues that can't easily by found or fixed.

You are not using OSX here.   Migrating settings and applications may or may not work.  :)

1. Create a USB Stick

On Fedora 19, these instructions didn't work for me.   Here is what I ended up doing.  Get a USB stick that doesn't have anything important on it.
  1. Download the ISO image.
  2. Insert the USB stick.
  3. Start the Disks application and select the USB drive in the left panel. 
  4. Unmount the USB disk filesystem if it is mounted. 
  5. Up at the top of the right panel, click on the gear icon and select Restore Disk Image.
  6. Select the downloaded ISO image file, and click Start Restoring.... 

2. Boot using the USB Stick, complete the installation

Shut down the machine, and re-start.   If you need to, use the BIOS to select the USB as the boot drive. 

Go through the install process.   Best to dedicate a HDD to the install, that way you can boot from that drive via BIOS boot selector if you want multiple OS's on your computer without too much hassle.   In my case, I've got a dual boot workstation, with a HDD dedicated to booting Linux.   I use the BIOS boot drive selector to boot up Fedora instead of WinDoze. 

NOTE: I've found that EZbcd doesn't play nice with UEFI boot partitions that Fedora 20 installs.    Best to just use the BIOS to select a boot disk.


Using FedUp

WARNING, THIS DOESN'T ALWAYS WORK.   Almost every time I've done this, there were some strange after-effects with GNome at least.

For newer versions of Fedora (newer than 17), FedUp with the network upgrade is the way to go:

$ sudo yum install fedup
$ sudo yum update fedup fedora-release
$ sudo fedup --network 20

Where 20 is the version you want to upgrade to.  Fedup will automatically reboot the system when it's done downloading everything.


The Fedora site says: "Prior to Fedora 17, the DVD/ISO/USB Drive option is recommended."

Yeah, well... what they really mean is, that FedUp will probably get you something that boots and runs some things, but you may discover later on that many settings are just plain broken.


Tuesday, April 8, 2014

MySQL - Making Snapshots and Loading Snapshots

Just a quick note on how to make database snapshots with MySQL.

Create a compressed snapshot:

$ mysqldump --single-transaction -udbuser -pdbpass somedb | bzip2 > somedb.sql.bz2

  • The --single-transaction option can be left out if you are not using InnoDB.
  • In newer versions of MySQL/Moriadb, --opt is the default, so there's no need to specify it.
Load a compressed snapshot:

$ bunzip2 -c somedb.sql.bz2 | mysql -u dbuser -pdbpass somedb 

These commands are usually best done as a background job, as they can take some time to complete. Also, they may cause long delays for any applications using the database, so it's a good idea to shut the application servers down before creating a snapshot.

Monday, March 31, 2014

Seam 2 Gotchas - Part 1

A few common mistakes I've seen made with Seam 2:

Referencing EJB Components Directly

I think it's pretty easy to know that referencing a Seam component that happens to be an EJB directly (with @EJB or with a JNDI lookup) is probably not going to end well, but a novice Seam developer might make this mistake.  This mistake is more likely when writing code in a non-JSF part of the system (e.g. a Servlet).

Here's what you can do about it:
  1. Make sure EJB Seam components are injected using @In, or look them up using Seam.   Make sure you have a clear distinction between 'regular' EJBs and Seam component EJBs.  Here are the two main things to avoid:    
    • INJECTING SEAM COMPONENTS WITH @EJB - Use @In instead!
    • LOOKING UP SEAM COMPONENTS WITH JNDI - Use Component.getInstance(name) or  Contexts.lookupInStatefulContexts(name) instead!
  2. In a non-JSF environment, use ContextualHttpServletRequest, for example, in a Servlet:
        @Override
        protected void service(HttpServletRequest request, final HttpServletResponse response) throws ServletException, IOException
        {
            //... do some stuff...
            new ContextualHttpServletRequest(request) 
            {
                @Override
                public void process() throws Exception
                {
                    // Access the components, do work.   The contexts will be properly set up here.
                    MyComponent component = (MyComponent)Component.getInstance("myComponent");
                }
            }.run();    // Run the request.
     
        }
    
    See this JBoss community post.   Personally, I strongly prefer using ContextFilter.
  3. In a non-JSF environment, apply the ContextFilter.   This will automatically wrap all requests in ContextualHttpServletRequest().

    For example:  <web:context-filter url-pattern="/servlet/*"/> in components.xml.
Note that when using ContextFilter or ContextualHttpServletRequest, exceptions may be handled differently than you might expect!

If anything inside the ContextFilter/ContextualHttpServletRequest throws an exception, then all the contexts will be torn down.   You may get other filters throwing java.lang.IllegalStateException: No active event context! after the ContextFilter/ContextualHttpServletRequest has finished!

Component Lookup - Component is not automatically created?

While injecting Seam components with @In is the simplest way to access another component, there are cases where a lookup is needed (e.g. in a Servlet).   The problem is, there is more than one way to look up components, and the method used to look up the component will determine the behavior:

  1. Contexts.lookupInStatefulContexts(name) - This is similar to @In : It will not create components automatically!
  2. Component.getInstance(name) - This is similar to @In(autocreate=true) : Components will be created automatically if they don't exist.
 Make sure you use the appropriate method for your use case.

Injected values are null?!?

If you are used to other DI frameworks, you may be expecting injected values to stick around.   Not always the case with Seam :

Seam will set injected fields to null when the request is finished.  Injection / uninjection happen before and after every method invocation.

So, if you access an instance outside of Seam's control, then the injected values might be null.


Tuesday, March 25, 2014

JBoss AS 7 and SLF4J

As side project at work, I'm porting a Java Enterprise 5 Seam 2 application to JBoss AS 7 (7.2, to be precise).   This application uses SLF4J for logging, and I quickly realized that without some careful configuration, the SLF4J log messages can get discarded.   That's not so great when trying to troubleshoot deployment problems!

(Side note: to post XML inside a <pre> tag on Blogger, use an HTML Encoder like this one)

Anyway, here's what I ended up doing to get it to work:
  1. Don't use the provided SLF4J module from the container.   This will allow the application to use it's own version of SLF4J and logging implementation (e.g. Log4J).   I did this by adding the following exclusions to jboss-deployment-structure.xml (like this):
            <exclusions>
                ... other modules ...
                <module name="org.apache.log4j" />
                <module name="org.slf4j" />
                <module name="org.slf4j.impl" />
            </exclusions>
    
    • Make sure to exclude the implementation org.slf4j.impl as well, otherwise the app server will supply it's own. 
    • For EAR deployments, this needs to be repeated in the sub-deployment for the WAR as well.   See this JBoss community post.

  2. Include the slf4j-api, and slf4j implementation jars (e.g. slf4j-log4j12 and log4j) in the lib directory of the EAR. In my case, this is just making sure that the Maven module for the EAR doesn't exclude these. Verify by locating the files in the target EAR.

    In the EAR pom.xml, I added the following dependencies:

           <dependency>
                <groupId>org.slf4j</groupId>
                <artifactId>slf4j-log4j12</artifactId>
                <scope>runtime</scope> 
            </dependency>
    
            <dependency>
                <groupId>log4j</groupId>
                <artifactId>log4j</artifactId>
            </dependency>
    

    In this case, the versions are specified in a dependency management pom.xml.   Also, you may need to change the scope to 'runtime' if the scope is set in the dependency management (to something else, like 'test').
  3. Put your log implementation config files where the implementation can see them.   For Lo4J, you can make a jar with log4j.xml in it, and put this in the lib directory of the ear.

Troubleshooting

Various things I encountered while setting this up...

No SLF4J Implementation


If you manage to exclude the SLF4J implementation, but the EAR doesn't contain one you may get this:

ERROR [stderr] (ServerService Thread Pool -- 65) SLF4J: Failed to load class "org.slf4j.impl.StaticLoggerBinder".
ERROR [stderr] (ServerService Thread Pool -- 65) SLF4J: Defaulting to no-operation (NOP) logger implementation
ERROR [stderr] (ServerService Thread Pool -- 65) SLF4J: See http://www.slf4j.org/codes.html#StaticLoggerBinder for further details.

In this case, just make sure the desired SLF4J implementation class is in the EAR lib directory. For example, add it as a dependency in your pom.xml.

JBoss-Specific Logging Configuration


I had an old log4j.xml that had some references to some older JBoss-specific logging features like this:

    <category name="javax">
        <priority value="INFO" class="org.jboss.logging.log4j.JDKLevel"/>
    </category>

These references caused ClassNotFoundExeptions when Log4J was initializing. To resolve this, I simply commented out these elements.

Also, I replaced org.jboss.logging.appender.RollingFileAppender with org.apache.log4j.RollingFileAppender.
 

Sunday, January 12, 2014

Replacing a bad hard drive in a ZFS pool - Linux/zfs-fuse

Thought I'd re-post this here, for convenience. I've got a home-brew NAS server that is running Fedora, zfs-fuse, and CIFS. The situation:
  • "Disk Utility" reports that drive /dev/sde has many bad sectors.
  • zpool status shows a degraded state for the main pool.  The drive is listed in the main pool by it's id.
    # zpool status -v
      pool: nasdata
     state: DEGRADED
    status: One or more devices could not be used because the label is missing or
        invalid.  Sufficient replicas exist for the pool to continue
        functioning in a degraded state.
    action: Replace the device using 'zpool replace'.
       see: http://www.sun.com/msg/ZFS-8000-4J
     scrub: resilver completed after 0h28m with 0 errors on Sat Feb 23 23:54:32 2013
    config:
    
        NAME                                      STATE     READ WRITE CKSUM
        nasdata                                   DEGRADED     0     0     0
          raidz1-0                                DEGRADED     0     0     0
            disk/by-id/ata-ST31500541AS_5XW0PDZ1  ONLINE       0     0     0
            disk/by-id/ata-ST31500541AS_5XW0PZJQ  ONLINE       0     0     0
            disk/by-id/ata-ST31500541AS_6XW1MKZZ  UNAVAIL      0   193     6  experienced I/O failures
            disk/by-id/ata-ST31500541AS_6XW1KRR9  ONLINE       0     0     0
    
    errors: No known data errors
    
Well that pretty much sums it up. No data errors in the array itself, but the disk is unavailable. Here's the process for replacing it:

  1. Tell zfs to take the disk offline:
    # zpool offline nasdata /dev/disk/by-id/ata-ST31500541AS_6XW1MKZZ
    

    Note that I'm using /dev/disk/by-id here. This is because that is how it is listed in the pool. 
  2. Shut the machine down.
  3. Add the new disk.  I also removed the failing disk because it was causing problems during POST.
    NOTE: REMEMBER TO LABEL YOUR DISKS! This really helps when the time comes to replace them! 
  4. Start the machine up.
  5. Tell zfs about the new disk:
    # zpool replace nasdata /dev/disk/by-id/ata-ST31500541AS_6XW1MKZZ /dev/disk/by-id/ata-SAMSUNG_HD204UI_S2HGJ90BA09450
    

    Note: I had to use the disk IDs because the pool set itself up that way in the first place (I had switched the drives to a new SATA card).
  6. Immediately ZFS begins replacing the disk:
    # zpool status 
      pool: nasdata
     state: DEGRADED
    status: One or more devices is currently being resilvered.  The pool will
        continue to function, possibly in a degraded state.
    action: Wait for the resilver to complete.
     scrub: resilver in progress for 0h0m, 0.00% done, 2695h59m to go
    config:
        NAME                                                 STATE     READ WRITE CKSUM
        nasdata                                              DEGRADED     0     0     0
          raidz1-0                                           DEGRADED     0     0     0
            disk/by-id/ata-ST31500541AS_5XW0PDZ1             ONLINE       0     0     0
            disk/by-id/ata-ST31500541AS_5XW0PZJQ             ONLINE       0     0     0
            replacing-2                                      DEGRADED     0     0     0
              disk/by-id/ata-ST31500541AS_6XW1MKZZ           OFFLINE      0   193     6
              disk/by-id/ata-SAMSUNG_HD204UI_S2HGJ90BA09450  ONLINE       0     0     0  2.34M resilvered
            disk/by-id/ata-ST31500541AS_6XW1KRR9             ONLINE       0     0     0
    errors: No known data errors
    

    Now hopefully this won't take 2695 hours to complete! :) Later on the status goes down to 11h. Okay, that's doable. 
  7. Several hours later, the new drive is incorporated into the pool:
    # zpool status -v
      pool: nasdata
     state: ONLINE
     scrub: resilver completed after 9h2m with 0 errors on Sun Feb 24 10:30:21 2013
    config:
            NAME                                               STATE     READ WRITE CKSUM
            nasdata                                            ONLINE       0     0     0
              raidz1-0                                         ONLINE       0     0     0
                disk/by-id/ata-ST31500541AS_5XW0PDZ1           ONLINE       0     0     0
                disk/by-id/ata-ST31500541AS_5XW0PZJQ           ONLINE       0     0     0
                disk/by-id/ata-SAMSUNG_HD204UI_S2HGJ90BA09450  ONLINE       0     0     0  916G resilvered
                disk/by-id/ata-ST31500541AS_6XW1KRR9           ONLINE       0     0     0
    errors: No known data errors
So that's it. While it was re-slivering, the ZFS filesystem was completely available. How nice! My SMB/CIFS shares were working just fine.